Stop treating your pantry staples like background noise. We are entering the realm of high-altitude logistics where the difference between a bitter, soapy mess and a nutty, transcendent grain lies in your commitment to the rinse. Most home cooks fail before they even ignite the burner because they ignore the saponins. These naturally occurring phytochemicals serve as a bitter defense mechanism for the plant; however, in your kitchen, they are the enemy of flavor. This is the definitive Inca Quinoa Prep protocol. We are not just boiling water; we are executing a thermal extraction and hydration sequence that demands precision. Imagine the grain not as a side dish, but as a structural foundation. When handled with technical rigor, the quinoa should exhibit a distinct "pop" upon mastication, releasing a toasted, earthy aroma that anchors the entire plate. If you are still dumping dry grains into a pot and hoping for the best, you are leaving flavor on the table. It is time to audit your workflow and elevate your grain game to professional standards.
THE DATA MATRIX
| Metric | Specification |
|---|---|
| Prep Time | 10 Minutes |
| Execution Time | 20 Minutes |
| Yield | 750ml / 3 Cups Cooked |
| Complexity (1-10) | 3 |
| Estimated Cost per Serving | $0.85 USD |
THE GATHERS
Ingredient Protocol:
- 200g / 1 cup Organic White or Tri-Color Quinoa.
- 475ml / 2 cups Filtered Water or Low-Sodium Vegetable Stock.
- 15ml / 1 tbsp Extra Virgin Olive Oil or Ghee.
- 2g / 0.5 tsp Fine Sea Salt.
- 1 Small Sprig of Fresh Thyme (Optional for infusion).
Section A: Ingredient Quality Audit:
The primary failure point in Inca Quinoa Prep is the age of the grain. Quinoa contains natural oils that can turn rancid if stored in clear plastic bins under harsh kitchen lights. If your dry grain smells like old cardboard or dusty attic air, the lipid oxidation has already begun. You cannot cook your way out of rancidity. To fix this, always source grains from high-turnover suppliers and store them in airtight, opaque containers. Another common issue is "dusty" stock. If using pre-packaged vegetable broth, ensure it is not overly viscous or heavy on celery salt, as this will mask the delicate nuttiness of the grain. If your stock is too salty, dilute it with 25% filtered water to maintain the osmotic balance during hydration.
THE MASTERCLASS
Step-by-Step Execution:
1. The Mechanical Saponin Extraction
Place your dry quinoa into a fine-mesh sieve. Submerge the sieve in a bowl of cold, filtered water and agitate the grains vigorously with your hand for 60 seconds. You will notice the water becoming cloudy and slightly foamy. This is the saponin layer shedding. Lift the sieve and rinse under a high-pressure cold stream until the water runs crystal clear.
Pro Tip: Use a digital scale to measure your grain by weight rather than volume. Volumetric measurements are notoriously inaccurate due to settling. The science here is simple: removing the saponins eliminates the "soapy" aftertaste and allows the grain to absorb seasoned liquid more efficiently.
2. The Maillard Toasting Phase
Set a stainless steel saucier over medium-high heat. Add your fat of choice (oil or ghee). Once the fat begins to shimmer, add the rinsed, drained quinoa. Stir constantly with a heat-resistant spatula for 3 to 4 minutes. You are looking for the grains to dry out, turn a shade darker, and emit a toasted, popcorn-like aroma.
Pro Tip: Toasting the grain triggers the Maillard reaction, creating complex flavor compounds that raw boiling cannot achieve. This also helps to render out any remaining surface moisture, ensuring the grains remain individual and fluffy rather than clumping into a gelatinous mass.
3. The Controlled Hydration
Pour your measured liquid into the saucier. Be prepared for a violent burst of steam; use the liquid to deglaze any toasted bits stuck to the bottom. Add your sea salt and thyme. Bring the mixture to a rolling boil, then immediately reduce the heat to the lowest possible setting. Cover with a tight-fitting lid.
Pro Tip: A saucier is superior to a straight-sided saucepan because its curved bottom prevents grains from getting trapped in the corners and scorching. The low heat ensures that the water is absorbed through capillary action rather than evaporating too quickly.
4. The Steam-Locked Finish
Simmer for exactly 15 minutes. Do not lift the lid. Once the timer expires, remove the pot from the heat source entirely. Let it sit, undisturbed and covered, for an additional 5 minutes. Finally, remove the lid and use a bench scraper or a fork to gently aerate the grains.
Pro Tip: This resting period is critical for moisture redistribution. It allows the starch granules to firm up slightly, preventing the grains from bursting and becoming mushy. The residual heat finishes the cooking process gently.
Section B: Prep & Timing Fault-Lines:
The most frequent timing error is the "Early Peak." Lifting the lid during the simmer phase releases the steam pressure required to fully hydrate the germ of the grain. If you find the water has evaporated but the grains are still crunchy, do not just add more water. Instead, remove from heat, add 30ml of boiling water, and cover tightly for 10 minutes. The residual steam will often fix the texture without turning the batch into porridge. If your temperature was too high and the bottom scorched, do not stir. Carefully scoop the "clean" quinoa from the top into a new vessel; the scorched flavor is concentrated at the base and will ruin the entire batch if integrated.
THE VISUAL SPECTRUM
Section C: Thermal & Visual Troubleshooting:
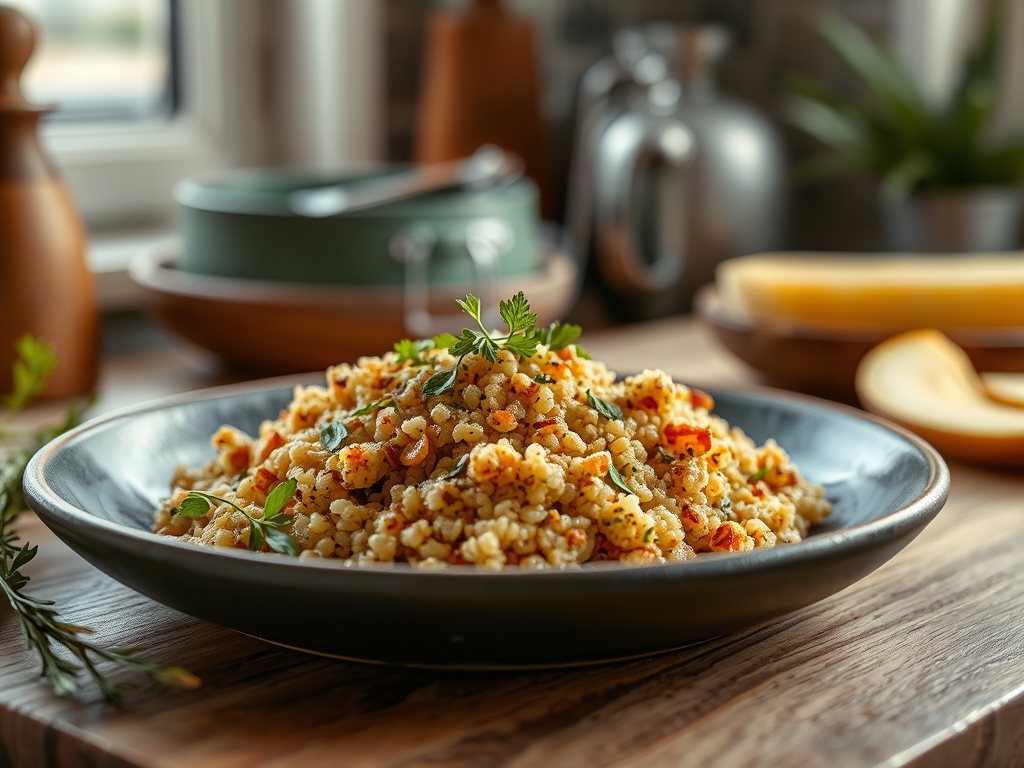
Referencing the Masterclass photo, your quinoa should display a "spiral" or "halo" around each grain. This is the germ separating slightly from the starchy endosperm. If you do not see these white spirals, the grain is undercooked. If the grains look translucent and flat, they are over-hydrated.
Uneven Browning: If some grains are dark brown and others are white after the toasting phase, your heat was too high or your stirring was inconsistent. This leads to bitter notes. Ensure even distribution across the pan surface.
Dull Colors: If your tri-color quinoa looks grey or muted, your rinse was insufficient. Residual saponins and dust create a film that dulls the natural pigments.
Viscous Texture: If the grains are sticking together in a clump, you likely skipped the toasting phase or used too much liquid. Quinoa should be free-flowing and "bouncy" when fluffed.
THE DEEP DIVE
Macro Nutrition Profile:
A standard 185g (1 cup) serving of cooked quinoa provides approximately 222 calories, 8g of protein, 5g of fiber, and 4g of fat. It is a complete protein, containing all nine essential amino acids, making it a powerhouse for cellular repair and metabolic function.
Dietary Swaps:
- Vegan: Use vegetable bouillon or mushroom dashi to infuse the grains with deep umami.
- Keto: While quinoa is a grain, those on a "liberal" keto path may use smaller portions (50g) as a fiber source. For a true keto alternative, apply the same toasting technique to riced cauliflower.
- GF: Quinoa is naturally gluten-free; however, cross-contamination is common. Always audit your packaging for a certified GF seal.
Meal Prep & Reheating Science:
To maintain molecular structure during refrigeration, spread the cooked quinoa on a sheet tray to cool rapidly before containerizing. This prevents "carry-over cooking." When reheating, add 15ml of water per cup of quinoa and cover with a damp paper towel. Microwave on medium power to re-steam the grains, or sauté in a pan with a splash of oil to re-crisp the exterior.
THE KITCHEN TABLE
Why is my quinoa always bitter?
You are likely skipping the mechanical rinse. Saponins are stubborn and require vigorous agitation in cold water to fully detach from the grain surface. Even "pre-rinsed" brands benefit from a secondary audit under the tap.
Can I use a rice cooker for this?
Yes, but you must still perform the toasting phase in a separate pan first. Toasting is the non-negotiable step for flavor development. Use the "white rice" setting and the same 1:2 grain-to-liquid ratio.
How do I make the flavor more piquant?
Deglaze the pan with a splash of dry white wine or lemon juice after toasting but before adding the water. The acidity will brighten the earthy notes and provide a sophisticated finish to the palate.
Is it safe to eat the "tails" or spirals?
Absolutely. Those spirals are the germ of the seed. They are the most nutrient-dense part of the plant and a visual indicator that your Inca Quinoa Prep has reached the ideal thermal threshold.