Imagine the scent of hardwood timber collapsing into a bed of incandescent embers. This is not a campfire story; it is a high stakes engineering project where the medium is mineralized carbon and the goal is the perfect crust. Early American Ashcakes represent the primal intersection of survival and chemistry. Forget the sterile environment of a convection oven. We are dealing with direct conduction, where the thermal mass of the earth itself becomes the vessel. To master the ashcake is to understand the precise moment when cornmeal undergoes a rapid gelatinization before being armored by a layer of protective ash. It is a gritty, visceral, and unapologetically bold method of preparation that demands absolute control over your fuel source. When executed correctly, the result is a dense, smoky disc of golden grain that defies modern culinary fragility. We are stripping away the stainless steel safety nets to audit the very foundation of frontier sustenance. Prepare your hearth; we are about to conduct a thermal analysis on the most resilient bread in history.
THE DATA MATRIX
| Metric | Specification |
|---|---|
| Prep Time | 10 Minutes |
| Execution Time | 25 Minutes |
| Yield | 4 Substantial Cakes |
| Complexity (1-10) | 7 (Requires Fire Mastery) |
| Estimated Cost per Serving | $0.45 USD |
THE GATHERS
Ingredient Protocol:
- 240g / 2 cups Stone-ground yellow or white cornmeal.
- 5g / 1 tsp Fine sea salt.
- 235ml / 1 cup Boiling filtered water.
- 15ml / 1 tbsp Rendered animal fat or high-smoke point oil.
- Additional water as needed to achieve a viscous consistency.
Section A: Ingredient Quality Audit:
The primary failure point in Early American Ashcakes is the granulation of the cornmeal. If your meal is too fine, like commercial corn flour, the cake will collapse into a gummy mass. If it is too coarse, it will remain gritty and fail to infuse with the moisture. Fix: Use a stone-ground product that retains the germ. If your dough feels brittle, the starch hasn't sufficiently hydrated. Ensure your water is at a rolling boil to trigger immediate starch swelling. Another common issue is "flat" flavor. Fix: Ensure your salt is high quality; without it, the earthy notes of the corn will be lost to the overwhelming smoke of the embers.
THE MASTERCLASS
1. Hydration and Molecular Alignment
Begin by weighing your cornmeal on a digital scale for precision. Place the meal and salt into a heat-proof bowl. Pour the boiling water over the dry ingredients and stir vigorously with a stiff spatula. You are looking to create a dough that is pliable but not sticky. Cover the bowl and let it rest for five minutes.
Pro Tip: This resting period allows the heat to penetrate the center of the grain particles, ensuring the final texture is not sandy. This is a form of "pre-gelatinization" that stabilizes the structure before it hits the fire.
2. Manual Shaping and Compression
Once the dough is cool enough to handle, use a bench scraper to divide the mass into four equal portions. Roll each portion into a ball and then flatten it into a disc approximately half an inch thick. Ensure there are no deep cracks along the edges, as these will become structural weak points during the baking process.
Pro Tip: Compression is key. By firmly pressing the dough, you reduce the internal air pockets, which prevents the cake from steaming itself apart when it encounters the intense heat of the embers.
3. The Ember Bed Preparation
Rake your fire to create a flat, glowing bed of coals. You do not want active flames, which will scorch the exterior before the interior is set. Use a heavy-duty poker to clear a small "nest" in the hot ash. The ash acts as a natural insulator and a non-stick barrier between the dough and the direct carbon.
Pro Tip: The ash must be white and powdery. This "clean" ash provides a sterile environment and a high-surface-area contact point for even thermal distribution.
4. Conduction and Encapsulation
Place the discs directly onto the hot ash and immediately cover the tops with more warm ash and a few small embers. This creates a 360-degree radiant heat chamber. Bake for approximately 7 to 10 minutes per side, depending on the intensity of your coal bed.
Pro Tip: Use a long-handled offset spatula to flip the cakes. This professional tool allows for delicate movement without disturbing the integrity of the forming crust.
5. The Final De-Ashing Audit
Remove the cakes from the fire once they feel firm to the touch. Use a stiff natural-bristle brush to remove the excess ash. Do not be afraid of a little residual gray; it provides a piquant mineral quality that defines the dish. Rinse quickly with hot water if necessary and pat dry immediately.
Pro Tip: The thermal carryover will continue to cook the interior for several minutes. Place the cleaned cakes on a wire rack to prevent the bottom from becoming soggy via condensation.
Section B: Prep & Timing Fault-Lines:
The most frequent human error is "rushing the fire." If the coals are too hot, you will achieve a burnt exterior and a raw, doughy center. Fix: Use an infrared thermometer to check the ember bed; you are looking for a surface temperature between 400F and 450F. If the dough is too wet, it will trap ash inside the cake. Fix: Adjust the moisture levels until the dough can be handled without leaving residue on your palms.
THE VISUAL SPECTRUM
Section C: Thermal & Visual Troubleshooting:
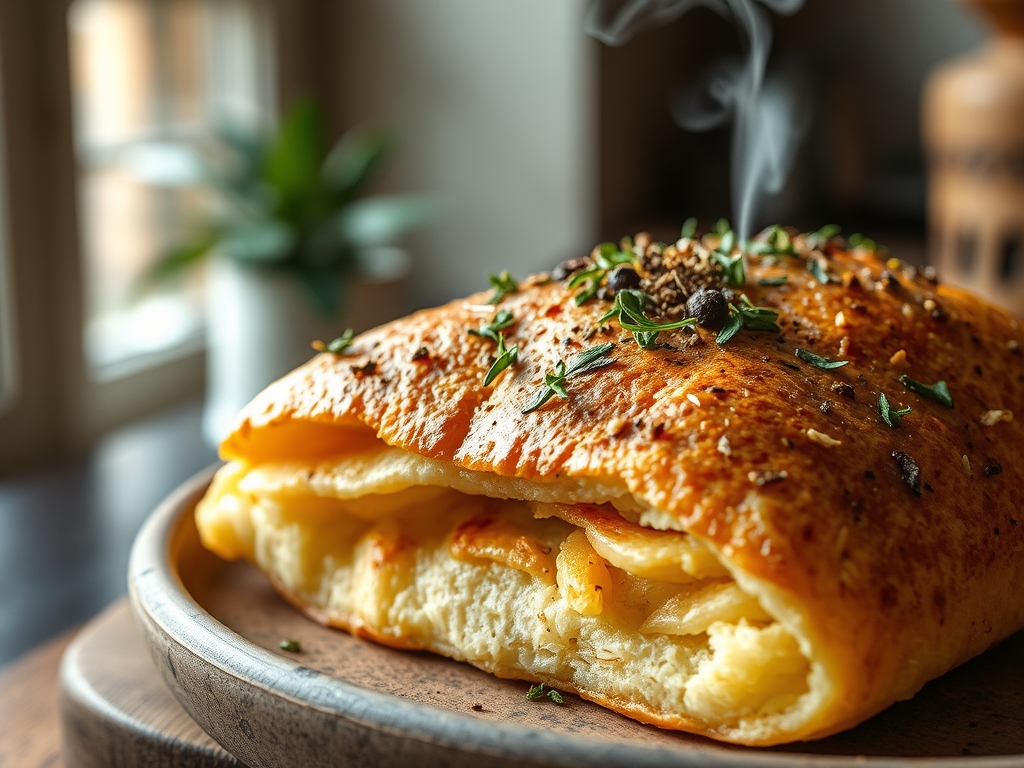
Referencing the Masterclass photo, a successful ashcake should exhibit a "mottled" appearance. You are looking for deep golden hues punctuated by dark, charred spots where the embers made direct contact. If your cakes look pale and uniform, your fire lacked the necessary BTU output to trigger the Maillard reaction. If the cake is crumbling, it indicates a lack of "structural viscous binding," likely from under-hydrating the cornmeal. A dull, matte finish is expected, but if the cake looks "dusty" even after cleaning, it may have been buried in cold ash rather than hot embers. The ideal texture is a resounding "thump" when tapped, indicating a hollow, fully baked interior and a rigid exterior shell.
THE DEEP DIVE
Macro Nutrition Profile:
These cakes are a powerhouse of complex carbohydrates and fiber. A single serving provides approximately 220 calories, 4g of protein, and 2g of fat. The mineral content is slightly higher than oven-baked bread due to the trace ash absorption, which contributes potassium and magnesium.
Dietary Swaps:
- Vegan: Use coconut oil or vegan butter in place of animal fat.
- Keto: This is a grain-based dish and is inherently high-carb. A keto "ashcake" would require almond flour and a binding agent like psyllium husk, though the structural integrity in a fire is difficult to maintain.
- GF: Pure cornmeal is naturally gluten-free; ensure your source is certified to avoid cross-contamination.
Meal Prep & Reheating Science:
To maintain the molecular structure, store ashcakes in a breathable cloth rather than plastic. Reheat them by placing them directly on a cast-iron skillet over medium heat. This "dry-fry" method restores the exterior crunch without making the interior rubbery. Avoid the microwave, as it will aerate the moisture and turn the cake into a sponge.
THE KITCHEN TABLE
Can I use a regular oven for this?
Technically yes, but you lose the "ash-curing" flavor profile. Use a preheated pizza stone at 450F and dust the bottom with extra cornmeal to simulate the dry conduction of the hearth.
Is eating ash actually safe?
Hardwood ash (oak, maple, hickory) is non-toxic and has been used for centuries as a leavening agent and mineral supplement. Avoid softwoods like pine, which contain bitter resins and harmful volatile oils.
Why did my ashcakes turn purple?
If you use blue cornmeal, the alkalinity of the ash can shift the pH balance, causing a color change. This is a natural chemical reaction and is perfectly safe to consume.
How do I know when they are done?
The "tap test" is the gold standard. A firm, hollow sound indicates the moisture has been sufficiently evaporated and the starches have set. If it feels soft or heavy, it needs more time.